Business Central Add-in for Excel. Behind the scenes

Introduction

In this article, I would like to discuss the nuances and pitfalls when working with “Excel Add-In”. We will also look behind the scenes and consider the mechanism of work and whether it is possible to make changes in the code to meet the requirements of the customer. I hope this will be useful for both the business analysts and the developers.

How to install and configure for Business Central On-Premises

The installation procedure is described in detail on the Microsoft Learn, so here I will only provide some links:

Setting up the Business Central Add-in for Excel in Business Central On-premises

Get the Business Central Add-in for Excel

Viewing and Editing in Excel From Business Central

Notes

·       The add-in works with Excel for the web (online) from any device as long as as use a supported browser. It also works with the Excel app for Windows (PC); but not for macOS. Unfortunately, I didn’t have a chance to check if “Add-Ins Excel” really doesn’t work on Mac. I would be grateful if you share this information.

·       If you configured the “Excel Add-In” to work with Business Central on premises, don’t forget modify configuration as described below: Modify the Excel Add-in Configuration to Support July 2022 Update

Add-Ins Excel. How it works.

Every time when you click on “Edit in Excel

In this example, I pressed “Edit in Excel” on the page “Sales Order List (9305, List)

the system create web service, if it doesn’t exist.

If we look at the object that is used in web service, we will notice that this is “Sales Order (42, Document)” and not “Sales Order List (9305, List)” where I clicked on “Edit in Excel”.

The same thing for

Purchase Order List (9307, List) -> Purchase Order (50, Document)

Item List (31, List) – >Item Card (30, Card)

,etc.

Why so? For these pages (there are a number of tables for which this works differently, but I’ll cover that later) web service is created based on page from CardPageID. This must be taken into account when looking for errors or when you want to change something.

Let’s now take a look at the name of the service – Sales_Order_Excel

If we change language in our parameters on French ,for example, as result we will have two web services “Sales_Order_Excel” and “Document_de_vente_Excel” instead of one. The reason for this is that the name of the service is generated from the [Page Caption] and not the [Page Name]. This is also worth remembering.

Let’s go ahead and look at some of the issues I’ve encountered while working with “Excel Add-In”.

Troubleshooting

Sometimes, users run into problems with the “Excel Add-In”. This section gives some tips for how to unblock users in certain circumstances.

Issue: The add-in doesn’t start

Solution or workaround

Check whether the add-in is deployed centrally. Or, check whether the user is blocked from installing it locally.

The admin can configure Office so that users can’t acquire add-ins. In those cases, the admin must deploy the add-in centrally. For more information, see Deploy add-ins in the admin center

Issue: Data doesn’t load into Excel

Solution or workaround

Test the connection by opening another list in Excel from Business Central. Or, open the workbook in Excel in a browser.

If the user has specified a company name that contains special characters, the add-in can’t connect.

Issue: Data can’t publish back to Business Central.

Solution or workaround

Test the connection by opening the workbook in Excel in a browser.

Sometimes an extension can block the publishing job. If the page is extended or customized, remove the extensions, and then try again.

Issue: The dates are wrong

Solution or workaround

Excel might show times and dates in a different format than Business Central. This condition doesn’t make them wrong, and the data in Business Central won’t get messed up.

Issue:

For some list pages, editing multiple lines in Excel consistently causes errors. This condition can occur if OData calls include FlowFields and fields outside of the repeater control. Solution or workaround: On the Web Services page, select the Exclude Non-Editable FlowFields and Exclude Fields Outside of the Repeater check boxes for the published page. Selecting these check boxes excludes non-editable FlowFields and field from the eTag calculation. Comments: These check boxes are hidden by default. To show them on the Web Services page, use Personalization.

By the way, Microsoft plans to change this functionality based on information from Exclude FlowFields and fields outside repeater from ETag (OData). So stay tuned for new releases.

Issue:

Metadata was enable to retrieved for entry Sales_Order_Excel as it was not found

Solution or workaround

Check if web service with the same [Object Type] and [Object ID] exists but not published. Delete or publish this web service.

Now let’s take a look at what’s going on in Excel

Work in Excel

When we open the file generated by “Edit in Excel” and the “Excel Add-In” is not installed, the system display page to install “Excel Add-In”

Let’s look at options. Click on the button shown in the picture below

Here we can change environment and company

and change some parameters. The purpose of the parameters is intuitive from their names, so I will not dwell on them.

Let’s click on Design button

and we can see the data source – Sales_Order_Excel

But what should we do if we want to add another table? Just click + Add Table Select from drop-down list the web service you want to use as data source. In our case I selected SalesLines

Double-click on the fields you want to add from Available Fields to Selected Fields.

Pay attention to the special labels next to the field name, which indicate that this is a field

the primary key
read-only
read-only for new records

Clicked on Done we get error

To fix this, create new tab “SalesLine” and rename the old one to “SalesOrder”

and, voilà, we have two tables in one file

Note.

It does not always make sense to allow editing certain fields or even tables as a whole. For example, “Sales Lines” – editing fields such as “Quantity” or “Price” separately from “Sales Header” can lead to a violation of the system business logic. At the same time, If there are fields that carry only an informational load, for example, comments, then why not. So, a preliminary analysis is necessary in most cases.

What else can we do?

Ok. Let’s create PivotTable.

To do this, go to the tab “Table Design” and click on “Summarize with PivotTable”

In “PivotTable Fields” go to the bottom, click on “More Tables” and after that “Yes”

Then, create relationships between “tblSalesHeader” and “tblSalesLine” (We can use field “Document No.” only, because there is filter “Document Type” = Order)

Finally, we have pivot table with fields from both tables “Sales Header” and “Sales Line”

Now let’s move on to the topic, how can we change the code.

Development

If we look at source code of “System Application” (you can find it in installation files for On-Prem

“..\Applications\system application\source\System\Application.Source.zip“)

we can find application “Edit in Excel”

Let’s take a look at the contents of the file README.md

README.md

In the README.md file you will find a detailed description of how the “Excel Add-In” can be modified. I will give here only some snippets from there.

How to download an Edit in Excel file

procedure Example()
var
    EditinExcel: Codeunit "Edit in Excel";
    EditinExcelFilters: Codeunit "Edit in Excel Filters";
    FileName: Text;
begin
    EditinExcelFilters.AddField('Journal_Batch_Name', Enum::"Edit in Excel Filter Type"::Equal, JournalBatchName, Enum::"Edit in Excel Edm Type"::"Edm.String");
    EditinExcelFilters.AddField('Journal_Template_Name', Enum::"Edit in Excel Filter Type"::Equal, JournalTemplateName, Enum::"Edit in Excel Edm Type"::"Edm.String");
    FileName := StrSubstNo('%1 (%2, %3)', CurrPage.Caption, JournalBatchName, JournalTemplateName);
    EditinExcel.EditPageInExcel(CopyStr(CurrPage.Caption, 1, 240), Page::"Example page", EditinExcelFilters, FileName);
end;

How to override Edit in Excel functionality

[EventSubscriber(ObjectType::Codeunit, Codeunit::"Edit in Excel", 'OnEditInExcelWithFilters', '', false, false)]
local procedure OnEditInExcelWithFilters(ServiceName: Text[240]; var EditinExcelFilters: Codeunit "Edit in Excel Filters"; SearchFilter: Text; var Handled: Boolean)
begin
    // Note: Since EditinExcelFilters is sent by var, you can simply modify the filters and not handle the entire flow by not setting Handled := True
    if HandleOnEditInExcel(ServiceName, EditinExcelFilters, SearchFilter) then
        Handled := True;
end;

How to generate your own Excel file

procedure CreateExcelFile(ServiceName: Text[250]; EditinExcelFilters: Codeunit "Edit in Excel Filters"; SearchFilter: Text)
var
    EditinExcelWorkbook: Codeunit "Edit in Excel Workbook";
    FileName: Text;
begin
    // Initialize the workbook
    EditinExcelWorkbook.Initialize(ServiceName);

    // Add columns that should be shown to the user
    EditinExcelWorkbook.AddColumn(Rec.FieldCaption(Code), 'Code');
    EditinExcelWorkbook.AddColumn(Rec.FieldCaption(Name), 'Name');

    // Add any filters from the page (see below for how to create filters). Note: It's allowed to filter on columns not added to the excel file
    EditinExcelWorkbook.SetFilters(EditinExcelFilters);

    // Download the excel file
    FileName := 'ExcelFileName.xlsx';
    DownloadFromStream(EditinExcelWorkbook.ExportToStream(), DialogTitleTxt, '', '*.*', FileName);
end;

How to create filters

procedure CreateExcelFilters()
var
    EditinExcelFilters: Codeunit "Edit in Excel Filters";
begin
    // Let's add a simple filter "Blocked = False"
    EditinExcelFilters.AddField('Blocked', Enum::"Edit in Excel Filter Type"::Equal, 'false', Enum::"Edit in Excel Edm Type"::"Edm.Boolean");

    // Now the filter "No. = 10000|20000"
    EditinExcelFilters.AddField('No_', Enum::"Edit in Excel Filter Collection Type"::"or", Enum::"Edit in Excel Edm Type"::"Edm.String")
                        .AddFilterValue(Enum::"Edit in Excel Filter Type"::Equal, '10000')
                        .AddFilterValue(Enum::"Edit in Excel Filter Type"::Equal, '20000');

    // Finally let's add a range, "Amount = 1000..2000"
    EditinExcelFilters.AddField('Amount', Enum::"Edit in Excel Filter Collection Type"::"and", Enum::"Edit in Excel Edm Type"::"Edm.Decimal")
                        .AddFilterValue(Enum::"Edit in Excel Filter Type"::"Greater or Equal", '1000')
                        .AddFilterValue(Enum::"Edit in Excel Filter Type"::"Less or Equal", '2000');

    // Since we did not clear EditinExcelFilters in between, the current filter is "(Blocked = false) and (No_ = 10000|20000) and (Amount = 1000..2000)"
    // In other words, all the filters are added together.
end;

Some notes

The main procedure of the application is “EditPageInExcel”, where web service for the specified page is created, and the web service is used to prepare and download an Excel file for the Edit in Excel functionality.

If we search where this function is referenced in “Base Application”, we can see that it mostly Sales (Purchase) Subforms

action(EditInExcel)
{
   ApplicationArea = Basic, Suite;
   Caption = 'Edit in Excel';
   Image = Excel;
   Promoted = true;
   PromotedCategory = Category8;
   PromotedIsBig = true;
   PromotedOnly = true;
   Visible = IsSaaSExcelAddinEnabled;
   ToolTip = 'Send the data in the sub page to an Excel file for analysis or editing';
   AccessByPermission = System "Allow Action Export To Excel" = X;

   trigger OnAction()
   var
      EditinExcel: Codeunit "Edit in Excel";
      EditinExcelFilters: Codeunit "Edit in Excel Filters";
   begin
     EditinExcelFilters.AddField('Document_No', Enum::"Edit in Excel Filter Type"::Equal, Rec."Document No.", Enum::"Edit in Excel Edm Type"::"Edm.String");

      EditinExcel.EditPageInExcel(
        'Purchase_Order_Line',
        Page::"Purchase Order Subform",
        EditinExcelFilters,
        StrSubstNo(ExcelFileNameTxt, Rec."Document No."));
    end;
}

At the same time, two procedures “EditJournalWorksheetInExcel” and “EditWorksheetInExcel” from codeunit 6710 ODataUtility are used in Journal Pages.

procedure EditJournalWorksheetInExcel(PageCaption: Text[240]; PageId: Text; JournalBatchName: Text; JournalTemplateName: Text)
    var
        EditinExcel: Codeunit "Edit in Excel";
        EditinExcelFilters: Codeunit "Edit in Excel Filters";
        ObjectId: Integer;
    begin
        EditinExcelFilters.AddField('Journal_Batch_Name', Enum::"Edit in Excel Filter Type"::Equal, JournalBatchName, Enum::"Edit in Excel Edm Type"::"Edm.String");
        EditinExcelFilters.AddField('Journal_Template_Name', Enum::"Edit in Excel Filter Type"::Equal, JournalTemplateName, Enum::"Edit in Excel Edm Type"::"Edm.String");

        Evaluate(ObjectId, CopyStr(PageId, 5));
        EditinExcel.EditPageInExcel(PageCaption, ObjectId, EditinExcelFilters);
    end;

    procedure EditWorksheetInExcel(PageCaption: Text[240]; PageId: Text; "Filter": Text)
    var
        EditinExcelHandler: Codeunit "Edit in Excel";
        ObjectId: Integer;
    begin
        Evaluate(ObjectId, CopyStr(PageId, 5));
        EditinExcelHandler.EditPageInExcel(PageCaption, ObjectId);
    end;

References to “EditJournalWorksheetInExcel”

I didn’t find references to “EditWorksheetInExcel“. Perhaps its use is hidden from our eyes.

Summary

“Excel Add-in” is a very powerful tool for changing data from Business Central. But it must be used with extreme caution so as not to break the business logic and not lead to performance degradation if we want to change large amounts of data.

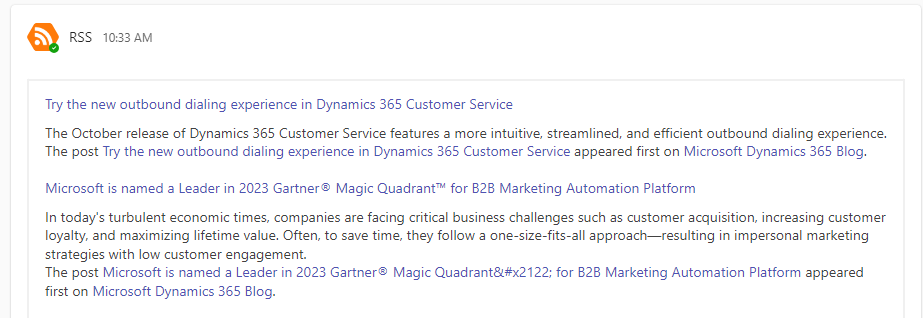
Business Central Blogs in Teams

Today we have access to a huge amount of information.
And it’s not surprising how easy it is to get drowned in this endless stream of blogs, news, etc.
In order to free yourself at least a little from constant surfing the Internet and reading email subscriptions, I propose one of the many ways to collect all the information in one place, namely, use RSS Feeds in Microsoft Teams

Connect RSS Feed in MS Teams

Connect the first RSS Feed

I’ll describe how I usually do it, but you can use other approaches.

  • Create new Team

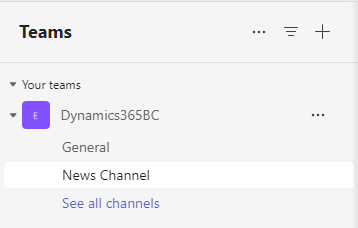
  • Create new channel “News Channel”
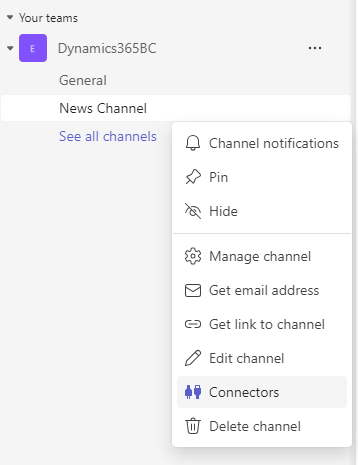
  • Right Click on the channel and select “Connectors”
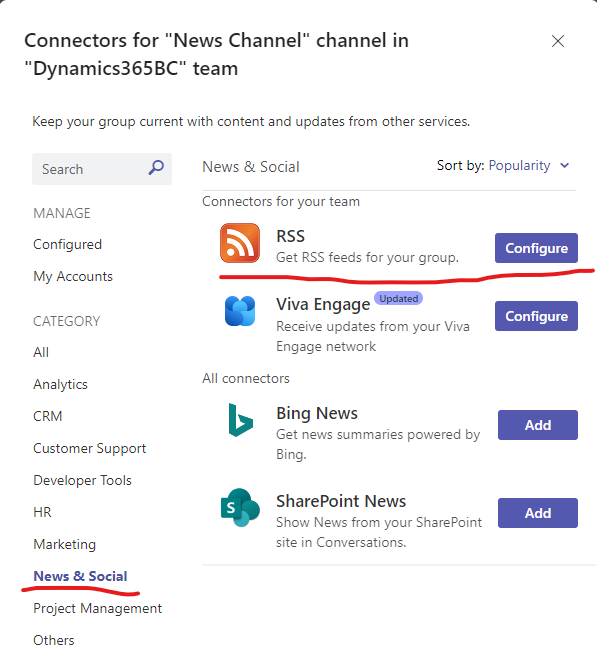
  • In the opened window, select “News & Social” and click “Configure” near RSS.
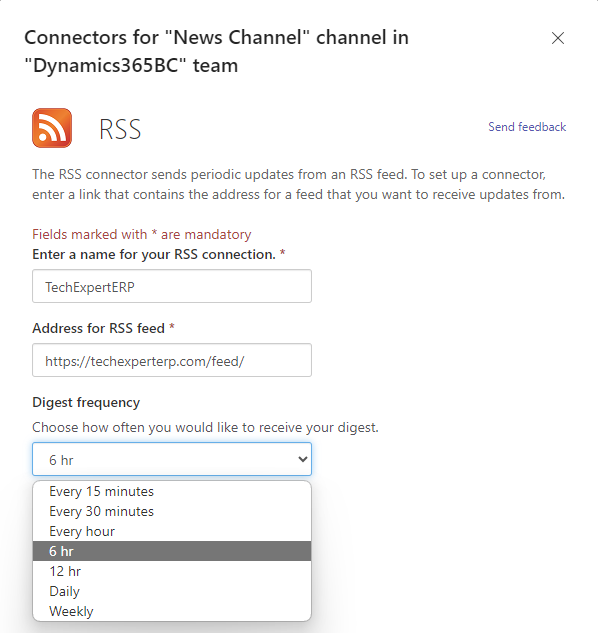
  • Fill in all required fields and click “Save

Connect more feeds
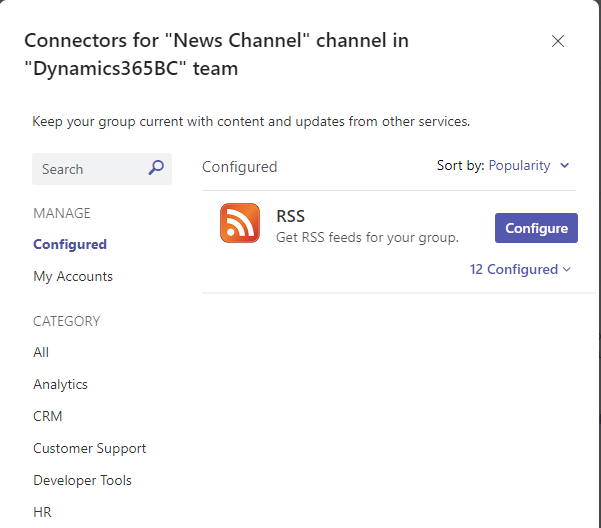
  • Open Connectors, click on “Configured“, and click “Configure“.

  • Here you can change the already connected feed. To do this just click “Manage

Finally, we have posts from connected feeds which we can discuss or send link

Popular authors and RSS feeds to their blogs

Below you will find links to blogs of people I follow. This is not a complete list and the only reason I didn’t list the rest is that I didn’t find how to connect RSS feeds from their blogs.

AuthorTwitterBlogRSS Feed
Aleksandar Totovic@atotovic https://totovic.com/https://totovic.com/feed/
Arend-Jan Kauffmann@ajkauffmannhttps://www.kauffmann.nl/https://www.kauffmann.nl/feed/
Eric Wauters@waldo1001https://www.waldo.be/https://www.waldo.be/feed/
Erik Hougaard@eHougaardhttps://www.hougaard.com/https://www.hougaard.com/feed/
Freddy Kristiansen https://freddysblog.com/https://freddysblog.com/feed/
Gunnar Gestsson@gunnargestssonhttps://www.dynamics.is/https://dynamics.is/?feed=rss2
Kamil Sacek@MVPKineblog.kine.cz/https://blog.kine.cz/index.xml
Luc van Vugt@lucvanvugtfluxxus.nlhttps://www.fluxxus.nl/index.php/feed/
Microsoft Dynamics 365 Business Central Blog Dynamics 365 Business Central Bloghttps://cloudblogs.microsoft.com/dynamics365/feed/
Olof Simren@MicrosoftNAVhttps://www.olofsimren.com/https://www.olofsimren.com/feed/
Roberto Stefanetti@robstefanehttps://robertostefanettinavblog.comhttps://robertostefanettinavblog.com/rss/
Søren Klemmensen@SorenKlemmensenhttps://klemmensen.ca/https://klemmensen.ca/feed/
Stefano Demiliani@demilianihttps://demiliani.com/https://demiliani.com/feed/

Business Central, Performance and Data Warehouse. Part II

There are many ways to track changes in the Business Central. I’ll give you an example of a few of them.

  1. Field “Last Modified Date time”. Here we are only talking about master tables, such as Item, Customer, Vendor, etc.

Pros

No additional development required. It could work well for small companies to update data source directly in Power BI, for example.

Cons

  • This field is not present in all master tables. And most often it is not in the tables that we need for analysis 🙁 . So, we should create table extension with all the ensuing consequences.
  • Plus, this field is changed in the triggers OnInsert(), OnModify(), OnRename(). We can miss some changes in data if there are insert or modify operations without executing the code in the triggers – Records.Insert(), Record.Modify() or Records.Insert(FALSE), Record.Modify(FALSE). For example, for better performance we want to use bulk insert, modify or delete.
  • We can’t track record deletions. But it depends on the data warehouse configuration. Very often we don’t delete data in a data warehouse at all to maintain the integrity of historical data.
  • When we rename record the system delete the old one and create new one. Let me remind you that there are no foreign keys in the BC database. Consequently, based on information from system virtual tables, such as table [Field] columns [RelationTableNo], [RelationFieldNo] , the system changes links in all related tables. That’s why it takes so long sometimes. Therefore, Rename (changing primary key) is a headache for any integration. And it’s best to avoid it as much as possible.

2. Field “Entry No.”. This applies to transactional tables as “Item Ledger Entry”, “Value Entry”, “G/L Entry”, etc.

Based on the postulate that data in transactional tables is not edited or deleted, we can use this field for replication, each time saving the value of the last replicated “Entry No.”. But there are always exceptions. In my practice, clients often change data manually for various reasons, mainly fixing errors. And in this case there will be a discrepancy between the data in the data warehouse and in the system.

3. Change Log

On the topic of using Change Log, I will dwell in detail in the next article.

But my advice is to use Change Log only in the master tables, only for certain fields and only when it is really necessary.

4. ISV Solutions as Replication in LS Central

Replication of data is a big part of the LS Central system, with the aim of having seamless flow of data between locations.

Replication and Data Director are a very broad topic. Here I would like to note that despite the fact that the main task is replication between the stores and head office, we can still use replication and Data Director to synchronize data with data warehouse.

Depending on the situation and budget, we may use the methods listed above with some limitations. But let’s get back to the topic of this series of articles and look at how we can use Change Tracking to synchronize data with data warehouse.

Change tracking

Change tracking captures the fact that rows in a table were changed, but doesn’t capture the data that was changed. This enables applications to determine the rows that have changed with the latest row data being obtained directly from the user tables. Therefore, change tracking is more limited in the historical questions it can answer compared to change data capture. However, for those applications that don’t require the historical information, there is far less storage overhead because of the changed data not being captured. A synchronous tracking mechanism is used to track the changes. This has been designed to have minimal overhead to the DML operations.

No alt text provided for this image

How to enable Change Tracking for a Database

You can enable change tracking using the next command:

ALTER DATABASE [Demo Database BC (22-0)] 
SET CHANGE_TRACKING = ON 
(CHANGE_RETENTION = 2 DAYS, AUTO_CLEANUP = ON)  

Or in SQL Server Management Studio by using the database Properties dialog box.

No alt text provided for this image

Enable Change Tracking for a Table

You can enable change tracking using the next command:

ALTER TABLE [CRONUS Canada, Inc_$Item$437dbf0e-84ff-417a-965d-ed2bb9650972] 
ENABLE CHANGE_TRACKING  
WITH (TRACK_COLUMNS_UPDATED = ON) 

Or in SQL Server Management Studio by using the Table Properties dialog box.

No alt text provided for this image

Here it is appropriate to ask the question – Do we need to enable change tracking for the principal table and all table extensions?

In our example, we have two tables related to table “Item”.

No alt text provided for this image

My answer is No. Every time when we change field in table extension record we update record in the principal table also.

Change Tracking and Business Central

One fact to support the use of Change Tracking that Change tracking is enabled in Dynamics NAV/BC databases by default.

For Dynamics NAV 2018 change tracking is enabled for the tables

  • Object Metadata
  • Add-in
  • Debugger Breakpoint
  • NAV App
  • NAV App Object Metadata
  • NAV App Tenant App
No alt text provided for this image

For Business Central change tracking is enabled for the tables

  • Published Application
  • Installed Application
  • Inplace Installed Application
No alt text provided for this image

And we can see tons of queries like

Dynamics NAV 2018

SELECT DISTINCT CT.SYS_CHANGE_VERSION, 0[Change Type], CT.SYS_CHANGE_OPERATION, CT.[Object Type], CT.[Object ID] , '00000000-0000-0000-0000-000000000000'[App Package ID], ''[Tenant ID]
FROM CHANGETABLE(CHANGES [dbo].[Object Metadata], @maxChangeTrackingNumberObjectMetadata) CT
UNION ALL
SELECT DISTINCT CT.SYS_CHANGE_VERSION, 1[Change Type], CT.SYS_CHANGE_OPERATION, 0[Object Type], 0[Object ID], '00000000-0000-0000-0000-000000000000'[App Package ID], ''[Tenant ID] 
				FROM CHANGETABLE(CHANGES [Debugger Breakpoint], @maxChangeTrackingNumberDebuggerBreakpoint) CT
UNION ALL
SELECT DISTINCT CT.SYS_CHANGE_VERSION, 2[Change Type], CT.SYS_CHANGE_OPERATION, 0[Object Type], 0[Object ID], '00000000-0000-0000-0000-000000000000'[App Package ID], ''[Tenant ID] 
			   FROM CHANGETABLE(CHANGES [dbo].[Add-in], @maxChangeTrackingNumberAddIn) CT WHERE CT.SYS_CHANGE_OPERATION = 'U'
UNION ALL
SELECT DISTINCT CT.SYS_CHANGE_VERSION, 3[Change Type], CT.SYS_CHANGE_OPERATION, CT.[Object Type], CT.[Object ID], CT.[App Package ID], ''[Tenant ID] 
FROM CHANGETABLE(CHANGES [dbo].[NAV App Object Metadata], @maxChangeTrackingNumberNavAppObjectMetadata) CT
UNION ALL
SELECT DISTINCT CT.SYS_CHANGE_VERSION, 4[Change Type], CT.SYS_CHANGE_OPERATION, 0[Object Type], 0[Object ID], CT.[App Package ID], CT.[Tenant ID] 
FROM CHANGETABLE(CHANGES [dbo].[NAV App Tenant App], @maxChangeTrackingNumberNavAppTenantApp) CT
UNION ALL
SELECT DISTINCT CT.SYS_CHANGE_VERSION, 5[Change Type], CT.SYS_CHANGE_OPERATION, 0[Object Type], 0[Object ID], CT.[Package ID], ''[Tenant ID] 
FROM CHANGETABLE(CHANGES [dbo].[NAV App], @maxChangeTrackingNumberNavApp) CT 

Business Central

SELECT DISTINCT CT.SYS_CHANGE_VERSION, 3[Change Type], CT.SYS_CHANGE_OPERATION, CT.[Object Type], CT.[Object ID], CT.[App Package ID], ''[Tenant ID]
FROM CHANGETABLE(CHANGES [dbo].[NAV App Object Metadata], @maxChangeTrackingNumberNavAppObjectMetadata) CT
UNION ALL
SELECT DISTINCT CT.SYS_CHANGE_VERSION, 4[Change Type], CT.SYS_CHANGE_OPERATION, 0[Object Type], 0[Object ID], CT.[App Package ID], CT.[Tenant ID] 
FROM CHANGETABLE(CHANGES [dbo].[NAV App Tenant App], @maxChangeTrackingNumberNavAppTenantApp) CT
UNION ALL
SELECT DISTINCT CT.SYS_CHANGE_VERSION, 5[Change Type], CT.SYS_CHANGE_OPERATION, 0[Object Type], 0[Object ID], CT.[Package ID], ''[Tenant ID] 
FROM CHANGETABLE(CHANGES [dbo].[NAV App], @maxChangeTrackingNumberNavApp) CT 

So, change tracking is actively used to track modification in metadata (tables, pages, codeunits).

The question arises why then we can not use it for our own purposes. Of course, this is only available On-Premise or Azure SQL. Perhaps in the future, Microsoft will give us access to configure change tracking for tables we need.

Change Tracking and Snapshot Isolation

To obtain consistent and correct results Microsoft recommends

use snapshot isolation

Change tracking has been designed to work well with snapshot isolation. Snapshot isolation must be enabled for the database. All the steps that are required to obtain changes must be included inside a snapshot transaction. This will ensure that all changes that are made to data while obtaining changes won’t be visible to the queries inside the snapshot transaction.

You can read more about snapshot isolation here.

The use of snapshot isolation in dynamics NAV/Business Central has been discussed since the appearance of Dynamics NAV 2018. I think this topic deserves a separate article in which I will try to describe in detail SQL Isolation Level and how we can use it in Business Central to improve performance.

Summary

Due to its lightness, the change tracker allows us to effectively use it not only to synchronize data with data warehouse, but also in integration with 3rd party system such as E-commerce or B2B system.

<< Previous

Business Central, Performance and Data Warehouse. Part I.

Next >>

To be continued…

Business Central, Performance and Data Warehouse. Part I.

Working for years on performance issues – deadlocks, locks, etc., I began to ask myself the question – “Is it possible to find a universal solution to performance issues?”.

In this series of articles, I want to present my vision. This is not a panacea for all ills, but it may help somebody to solve issues.

In Business Central, we are trying to combine two kinds of systems – OLTP and OLAP.

Let’s give a short description OLTP and OLAP and how they differ.

Online Transaction Processing (OLTP)

The management of transactional data using computer systems is referred to as online transaction processing (OLTP).

OLTP systems record business interactions as they occur in the day-to-day operation of the organization, and support querying of this data to make inferences.

Another words, OLTP system is transactional system that provides executing a number of transactions concurrently and supports strong consistency for transactions using various locking strategies, such as pessimistic locking, to ensure that all data is strongly consistent within the context of the enterprise, for all users and processes. So, all kinds of posting (Sales Orders, Purchase Orders, Picks, etc.) are part of OLTP system.

Online analytical processing (OLAP) is a technology that organizes large business databases and supports complex analysis.

It can be used to perform complex analytical queries without negatively affecting transactional systems.

Online analytical processing (OLAP)

And here we are talking about reports. Not an invoice or warehouse receipt, but analytical reports that require a significant amount of data to be received.

Thus, we have a paradox.

For the speed of creating or changing records in transactions, we should have as few indexes as possible in the table, including SIFT indexes, which are indexed views physically.

At the same time, for effective reporting, we need indexes like air.

Therefore, it is necessary to find a balance, which is far from a trivial task.

What if we split OLTP and OLAP into two different databases?

The solution architecture can be represented in the following simplified scheme. In this example, we are talking about Business Central Database On-Premises or Azure SQL and Data Warehouse Azure SQL.

No alt text provided for this image

1.      In Business Central database we configured Change Data Capture or Change Tracking to track data changes.

2.      Using Azure Data Factory, we load data from BC database first into the staging tables, and then into dim and fact tables.

3.      In Power BI, we configure shared datasets based on dim and fact tables.

4.      Use shared datasets in our analytical reports.

Summary

This solution allows us to optimize the performance of our systems.

In the next article, I will take a detailed look at Change Data Capture and Change Tracking.

I’ll make a comparison and we’ll see how and where we can use them.

Next >>

Business Central, Performance and Data Warehouse. Part II.